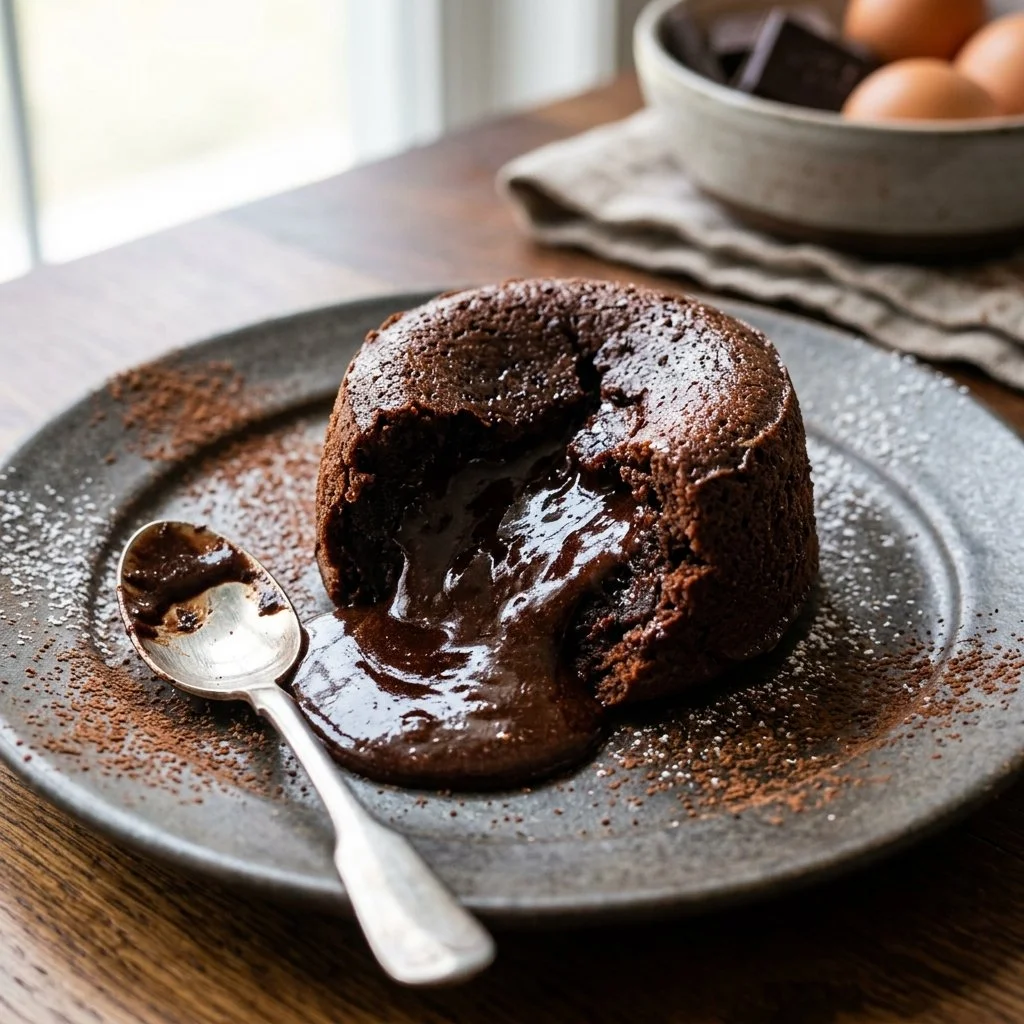
There’s something incredibly magical about a Chocolate Lava Cake that brings a wave of nostalgia crashing down. Perhaps it harks back to nights spent in cozy restaurants with twinkling candles or memorable celebrations punctuated by sweet moments. The first scoop of crème brûlée? Exquisite. But nothing quite compares to the thrill of digging into a Chocolate Lava Cake, that moment when the fork breaks through the delicate outer shell, and a luscious flow of warm chocolate cascades out. It’s a sweet little piece of indulgence that feels like a warm hug on a cold day, reminding us that sometimes the best things in life come in small, delicious packages.
## Recipe Timing
- Prep Duration: 15 minutes
- Active Cooking: 14 minutes
- Total Duration: 29 minutes
- Portion Size: Serves 4
- Complexity: Simple
## Nutritional Recipe
- Calories per portion: Approximately 350
- Protein: 6 grams
- Carbs: 30 grams
- Fats: 23 grams
- Fiber: 1 gram
- Sugars: 18 grams
- Sodium: 130 mg
## Why You’ll Love This Chocolate Lava Cake
From the rich, gooey center to the crisp edges, this Chocolate Lava Cake is a testament to the power of simplicity in dessert. Imagine the satisfying experience of having it melt in your mouth, warmed just enough to create an irresistible chocolate fountain. It’s perfect for impressing dinner guests or simply treating yourself after a long day. Plus, it’s easier than you think. You’ll wow your friends and family without having to spend hours in the kitchen!
## The Complete Cooking Journey
The journey to creating a perfect Chocolate Lava Cake is as joyful as the eating itself. You’ll find enrapturing aromas fill your kitchen as the chocolate and butter melt together. You’ll enjoy whisking the eggs and sugar until the mixture becomes a delightful shade of pale yellow, and the anticipation builds as you fold the batter into ramekins that promise to deliver soft, molten surprises. With just a quick bake, you’ll soon be crowning these delightful cakes with a kiss of powdered sugar, ready to transform an ordinary day into an extraordinary occasion.
## Ingredients:
- 1/2 cup unsalted butter
- 1 cup semi-sweet chocolate chips
- 2 large eggs
- 2 large egg yolks
- 1/4 cup sugar
- 2 tablespoons all-purpose flour
- 1/4 teaspoon salt
- Powdered sugar for dusting
- Vanilla ice cream (optional)
## Method:
Step 1: Preheat and Prepare
Preheat the oven to 425°F (220°C). Grease four ramekins with butter, and dust them with flour to ensure those lava cakes come out beautifully.
Step 2: Melt the Chocolate Bliss
In a microwave-safe bowl, combine the unsalted butter and semi-sweet chocolate chips. Melt them together in the microwave in 30-second intervals, stirring until smooth and well-combined.
Step 3: Whisk the Eggs and Sugar
In a separate bowl, whisk together the eggs, egg yolks, and sugar. Keep whisking until the mixture becomes thick and pale—a lovely sign that your base is coming together!
Step 4: Combine Chocolate and Eggs
Gently stir the melted chocolate mixture into the egg and sugar blend, ensuring you don’t lose that fluffy texture you just created. The mingling of these ingredients is where the magic begins!
Step 5: Fold in the Dry Ingredients
Carefully fold in the all-purpose flour and salt. This step is crucial—mix just until combined; you want to keep that airiness, that soft volume.
Step 6: Divide the Batter
Now, it’s time to share the joy! Divide the luscious batter evenly among the prepared ramekins, filling them about three-quarters full.
Step 7: Bake to Perfection
Pop the ramekins into the oven and bake for 12-14 minutes. The edges should be firm, while the center remains delightfully soft—an important distinction that creates the lava!
Step 8: Cool and Invert
Let them cool for about one minute. With a gentle nudge, invert each ramekin onto individual plates. This is where your masterpiece begins to show itself!
Step 9: Finish with a Touch of Sweetness
Dust each cake with powdered sugar for that perfect finishing touch. If you’re feeling indulgent, add a scoop of vanilla ice cream on the side—because why not?
## Serving Suggestions & Pairings
Serve these delightful chocolate cakes warm, right out of the oven, ideally paired with vanilla ice cream. The cold cream pairs beautifully with the hot melty chocolate, creating an epic harmony in every bite. Want to elevate it further? A sprinkle of sea salt or a drizzle of caramel sauce wouldn’t go amiss!
## Storage & Leftovers Guide
While these cakes are best eaten fresh, you can store any leftovers (if there are any!) in an airtight container in the fridge for up to 2 days. Just remember, reheat gently in the microwave for about 10 seconds to revive that gooey center.
## Kitchen Wisdom & Success Tips
- To avoid sticking, make sure to grease and flour your ramekins thoroughly.
- For an even richer flavor, try using dark chocolate instead of semi-sweet.
- If you want to add a twist, a dash of espresso powder in the batter can amplify the chocolate flavor significantly.
## Flavor Variations & Adaptations
Don’t be shy to tweak the recipe! Incorporate a splash of orange zest for an uplifted flavor profile, or mix in some raspberry puree into the batter for a fruity surprise. You can also swap the chocolate for white chocolate for a whole new experience!
## Reader Questions & Solutions
-
Can I use muffin tins instead of ramekins?
Absolutely! Just be sure to adjust the baking time, as they may need a few extra minutes. -
What can I do if I don’t have enough chocolate?
You can substitute part of the chocolate with cocoa powder. Just add a bit more butter to compensate. -
Can this recipe be made in advance?
Yes! You can prepare the batter and refrigerate it for up to a day before baking. -
How do I know when they are done baking?
Look for firm edges with a soft, jiggly center—it should still look a bit underbaked! -
How can I make this a gluten-free dessert?
Substitute all-purpose flour with a gluten-free blend or almond flour!
## Wrapping Up
With a few humble ingredients and a dash of love, you’ve transformed a simple recipe into a heartwarming dessert that’s bound to impress. Enjoy the joy of making your very own Chocolate Lava Cake, and share it with those who mean the most to you. After all, every great recipe is best savored when shared! Happy baking!
PrintChocolate Lava Cake
Indulge in the magical experience of a Chocolate Lava Cake, where a delicate outer shell gives way to a warm, flowing chocolate center.
- Prep Time: 15 minutes
- Cook Time: 14 minutes
- Total Time: 29 minutes
- Yield: 4 servings 1x
- Category: Dessert
- Method: Baking
- Cuisine: French
- Diet: Vegetarian
Ingredients
- 1/2 cup unsalted butter
- 1 cup semi-sweet chocolate chips
- 2 large eggs
- 2 large egg yolks
- 1/4 cup sugar
- 2 tablespoons all-purpose flour
- 1/4 teaspoon salt
- Powdered sugar for dusting
- Vanilla ice cream (optional)
Instructions
- Preheat the oven to 425°F (220°C). Grease four ramekins with butter, and dust them with flour.
- Melt the unsalted butter and semi-sweet chocolate chips together in a microwave-safe bowl, in 30-second intervals, stirring until smooth and well-combined.
- Whisk together the eggs, egg yolks, and sugar in a separate bowl until thick and pale.
- Stir the melted chocolate mixture into the egg mixture gently to maintain the fluffy texture.
- Fold in the all-purpose flour and salt just until combined.
- Divide the batter evenly among the prepared ramekins, filling them about three-quarters full.
- Bake for 12-14 minutes until the edges are firm and the center is soft.
- Cool for about one minute, then invert each ramekin onto plates.
- Dust each cake with powdered sugar and add a scoop of vanilla ice cream if desired.
Notes
For a richer taste, use dark chocolate; for a twist, add a dash of espresso powder or orange zest.
Nutrition
- Serving Size: 1 serving
- Calories: 350
- Sugar: 18g
- Sodium: 130mg
- Fat: 23g
- Saturated Fat: 14g
- Unsaturated Fat: 5g
- Trans Fat: 0g
- Carbohydrates: 30g
- Fiber: 1g
- Protein: 6g
- Cholesterol: 130mg