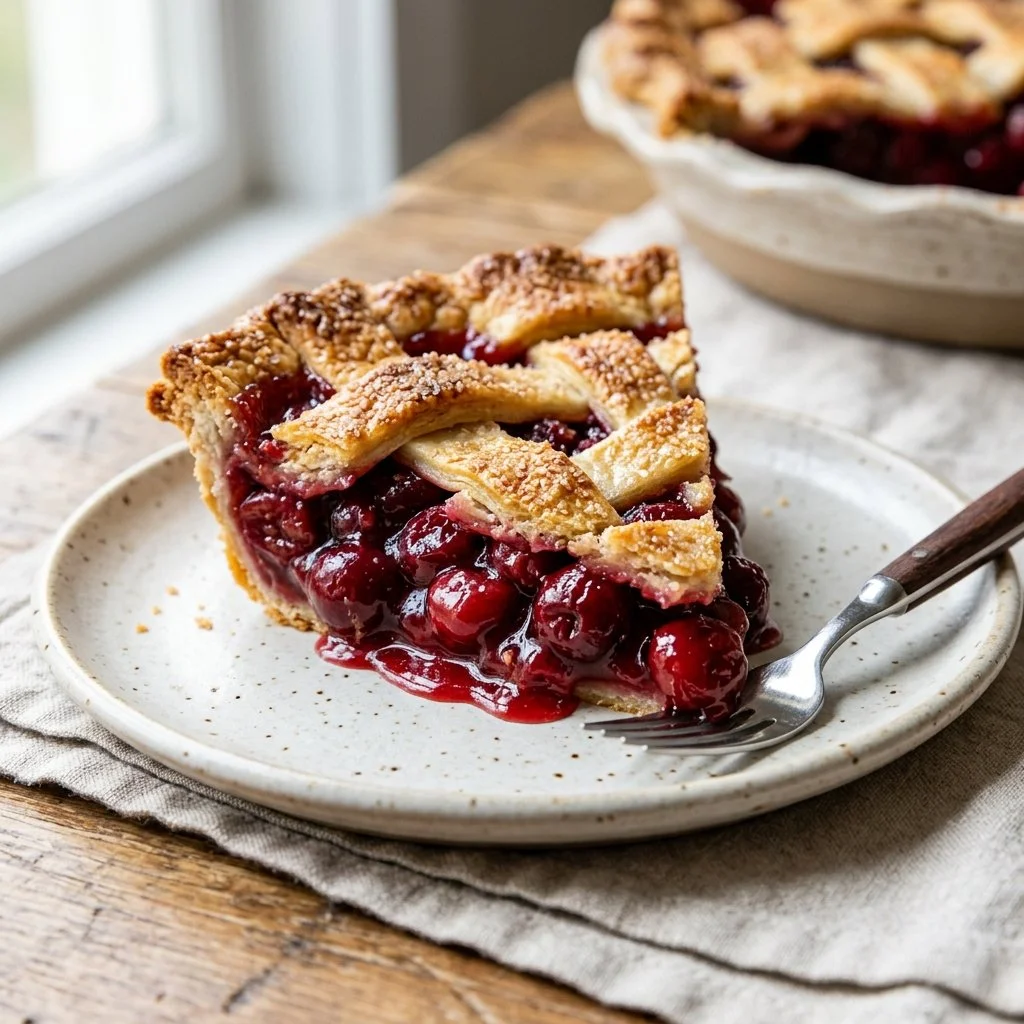
As I sit by the kitchen window, the sun streaming in and casting a warm glow over my countertop, I can’t help but think about the love stories that every recipe holds. Today, my heart swells at the thought of making a delicious Cherry Pie, a dish that evokes memories of vibrant summer days spent at my grandmother’s farmhouse. There was something truly magical about the process—picking cherries from the orchard, their juices staining our fingers, and hearing the laughter that filled the air as we created what would be a family favorite. It’s a timeless recipe that brings simple ingredients together to create something extraordinary, a pie bursting with tangy sweetness that delights the senses and wraps you in comfort. Let’s dive into making this nostalgic Cherry Pie together!
Recipe Timing
- Prep Duration: 15 minutes
- Active Cooking: 50 minutes
- Total Duration: 1 hour 5 minutes
- Portion Size: Serves 8
- Complexity: Simple
Nutritional Recipe
- Calories per portion: Approximately 250
- Protein: 2g
- Carbs: 36g
- Fats: 10g
- Fiber: 2g
- Sugars: 20g
- Sodium: 140mg
Why You’ll Love This Cherry Pie
This Cherry Pie is not just another dessert; it’s a vessel of memories and warmth, celebrating the simple joy of baking. The combination of fresh cherries and just the right amount of sugar creates a balance of tart and sweet flavors that dance on your palate. The flaky crust, whether homemade or store-bought, has a golden, crisp texture that cradles the juicy filling, making every bite a satisfying experience. This pie isn’t just about taste; it’s about bringing friends and family together, sharing stories, and making new memories around the table.
The Complete Cooking Journey
Picture this: your kitchen fills with the inviting aroma of cherries baking in the oven, the golden crust browning to perfection. As the pie cools, the anticipation builds, and you just know that the first slice will bring joy and nostalgia. Each step in the baking process is like a chapter in a beloved book, leading you closer to a comforting slice of happiness.
Ingredients:
- 2 cups fresh or frozen cherries
- 1 cup granulated sugar
- 2 tablespoons cornstarch
- 1 tablespoon lemon juice
- 1 teaspoon vanilla extract
- 1/4 teaspoon almond extract
- 1 tablespoon butter
- 1 pie crust (store-bought or homemade)
- 1 egg (for egg wash, optional)
- 1 tablespoon milk (for egg wash, optional)
Method:
Step 1: Preheat the Oven
Preheat the oven to 425°F (220°C). This step ensures that your pie will bake evenly and achieve that golden color we all love.
Step 2: Prepare the Cherry Filling
In a large mixing bowl, combine the cherries, sugar, cornstarch, lemon juice, vanilla extract, and almond extract. Mix well to coat the cherries evenly. The sweetness of the sugar and the acidity from the lemon juice create a beautiful balance that enhances the natural flavor of the cherries.
Step 3: Roll Out the Pie Crust
Roll out the pie crust carefully and fit it into a 9-inch pie plate. If using homemade crust, ensure it’s chilled for easier handling. Press the crust gently into place, making sure there are no air pockets underneath.
Step 4: Add Cherry Filling
Pour the cherry filling into the crust, making sure to distribute it evenly. Dot with small pieces of butter to enrich the filling, adding a touch of creaminess as it bakes.
Step 5: Seal the Pie
Cover the pie with another crust or create a beautiful lattice design. Don’t forget to seal the edges well to lock in all that deliciousness. Brush with an egg wash made from beaten egg and milk for a golden finish, if desired.
Step 6: Allow for Steam
Cut a few slits in the top crust to allow steam to escape. This prevents the filling from bubbling over and helps the crust bake properly.
Step 7: Bake to Perfection
Bake in the preheated oven for 45-50 minutes, or until the crust is golden brown and the filling is bubbling. The delightful smell that wafts through your kitchen is simply irresistible!
Step 8: Cool Before Serving
Allow the pie to cool before serving. This crucial step allows the filling to set, making it easier to slice and serve.
Serving Suggestions & Pairings
Serve your Cherry Pie with a scoop of vanilla ice cream or a dollop of freshly whipped cream to elevate each bite. For a delightful twist, pair it with a refreshing glass of homemade lemonade or a crisp white wine. This pie is perfect for summer gatherings, family dinners, or cozy evenings by the fireplace.
Storage & Leftovers Guide
If you miraculously have leftovers, store them covered in the refrigerator for up to 3 days. For longer storage, you can freeze slices of pie, wrapped tightly in plastic, then aluminum foil, for up to 3 months. When ready to enjoy, simply reheat in the oven for a freshly baked taste.
Kitchen Wisdom & Success Tips
- Use Quality Cherries: If using fresh cherries, look for plump and firm ones for the best flavor.
- Adjust Sweetness: Depending on your taste and the tartness of the cherries, feel free to adjust the sugar.
- Homemade Crust: If you’re up for a challenge, making your own pie crust can take this pie to the next level.
- Cover Edges: If the edges brown too quickly, cover them with aluminum foil while baking.
Flavor Variations & Adaptations
For a fun twist, consider adding other berries, like blueberries or raspberries, to the filling for a mixed berry pie. You can also experiment with spices like cinnamon or nutmeg for added depth of flavor.
Reader Questions & Solutions
-
Can I use frozen cherries?
Yes, frozen cherries work well! Just make sure to thaw and drain excess liquid before using. -
What can I substitute for almond extract?
You can simply omit it or use an equal amount of additional vanilla if preferred. -
How do I know when the pie is done baking?
Look for a golden brown crust and bubbling filling; a thermometer inserted should read around 200°F (93°C). -
Can I make this pie ahead of time?
Absolutely! You can prepare it the day before and store it in the fridge until ready to bake. -
What do I do if my pie crust shrinks while baking?
To prevent this, ensure your crust is well-chilled before baking and avoid stretching it while fitting it into the pie plate.
Wrapping Up
Every time I make this Cherry Pie, I am reminded of the warmth and love that comes from cooking. It’s not just about the end result, but also the journey and joy that comes with it. As you create this pie, may it bring you as much joy as it has brought to me and my family. Enjoy each bite, and never forget the delightful memories shared around the table! Happy baking!
PrintCherry Pie

A nostalgic Cherry Pie bursting with tangy sweetness, perfect for summer gatherings and family dinners.
- Prep Time: 15 minutes
- Cook Time: 50 minutes
- Total Time: 65 minutes
- Yield: 8 servings 1x
- Category: Dessert
- Method: Baking
- Cuisine: American
- Diet: Vegetarian
Ingredients
- 2 cups fresh or frozen cherries
- 1 cup granulated sugar
- 2 tablespoons cornstarch
- 1 tablespoon lemon juice
- 1 teaspoon vanilla extract
- 1/4 teaspoon almond extract
- 1 tablespoon butter
- 1 pie crust (store-bought or homemade)
- 1 egg (for egg wash, optional)
- 1 tablespoon milk (for egg wash, optional)
Instructions
- Preheat the oven to 425°F (220°C).
- In a large mixing bowl, combine the cherries, sugar, cornstarch, lemon juice, vanilla extract, and almond extract.
- Roll out the pie crust and fit it into a 9-inch pie plate.
- Pour the cherry filling into the crust, distributing it evenly.
- Cover the pie with another crust or create a lattice design, sealing the edges well.
- Cut a few slits in the top crust to allow steam to escape.
- Bake in the preheated oven for 45-50 minutes, or until golden brown.
- Allow the pie to cool before serving.
Notes
Serve with vanilla ice cream or whipped cream. Adjust sugar based on cherry tartness.
Nutrition
- Serving Size: 1 slice
- Calories: 250
- Sugar: 20g
- Sodium: 140mg
- Fat: 10g
- Saturated Fat: 3g
- Unsaturated Fat: 6g
- Trans Fat: 0g
- Carbohydrates: 36g
- Fiber: 2g
- Protein: 2g
- Cholesterol: 20mg