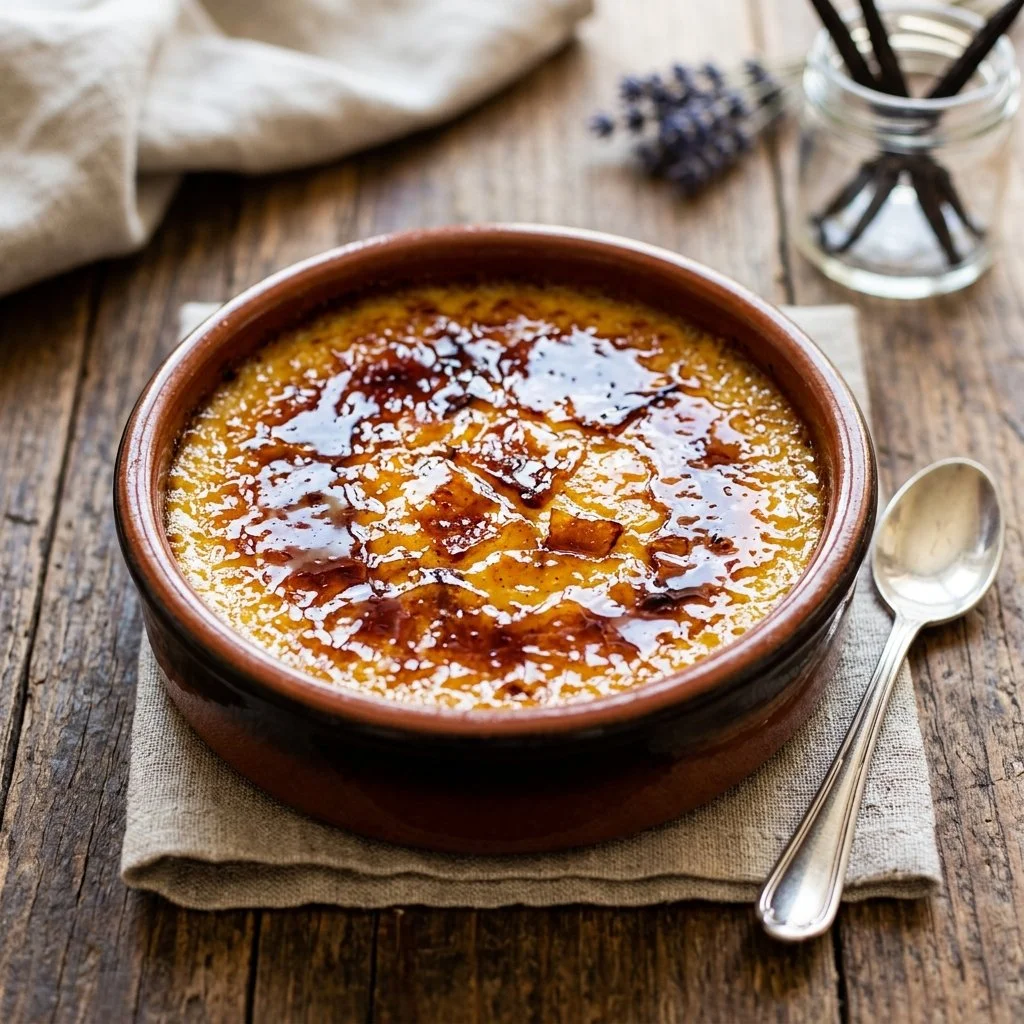
There’s something utterly enchanting about the first spoonful of a perfectly crafted crème brûlée. That glorious crack of the caramelized sugar top, followed by the velvety richness of the creamy custard beneath—it’s a dessert that feels indulgent yet surprisingly approachable. I remember the first time I had this delightful treat. It was at a charming little bistro where the scent of vanilla filled the air, drawing me in like a warm hug. As I savored each bite, I was captivated not just by the flavors but by the artistry that goes into creating such a simple yet elegant dessert. Today, I want to share with you how to recreate that moment in your very own kitchen.
Recipe Timing
- Prep Duration: 25 minutes
- Active Cooking: 45 minutes
- Total Duration: 2 hours and 15 minutes (including cooling time)
- Portion Size: Serves 4
- Complexity: Moderate
Nutritional Recipe
- Calories per portion: Approximately 400
- Protein: 7 grams per serving
- Carbs: 28 grams per serving
- Fats: 31 grams per serving
- Fiber: 0 grams per serving
- Sugars: 25 grams per serving
- Sodium: 85 mg per serving
Why You’ll Love This Creme Brulee
This crème brûlée recipe is not just a dessert; it’s an experience. The balance of the sweet, creamy custard with the crisp, caramelized sugar top is like a personal celebration in every bite. Plus, you’ll impress your family and friends with your culinary prowess! Making crème brûlée at home allows you to control the ingredients and customize the flavor, whether you prefer classic vanilla or a daring twist with matcha or lavender. It’s simple, yet it leaves a lasting impact—perfect for dinner parties, special occasions, or just treating yourself after a long day.
The Complete Cooking Journey
Let’s not delay the satisfaction any longer! Gather your ingredients, roll up your sleeves, and let’s embark on this sumptuous journey together.
Ingredients:
- 2 cups heavy cream
- 1 vanilla bean (or 1 teaspoon vanilla extract)
- 5 large egg yolks
- 1/2 cup granulated sugar
- 1/4 cup brown sugar (for caramelizing)
- Pinch of salt
Method:
Step 1: Preheat the Oven
Start by preheating your oven to 325°F (160°C). This initial step is essential as it ensures the custard cooks evenly.
Step 2: Simmer the Cream
In a saucepan, heat the heavy cream along with the split and scraped vanilla bean over medium heat until it just begins to simmer. Once you see those gentle bubbles forming, remove it from heat and let it steep for 15 minutes. This allows the vanilla to infuse its aromatic magic into the cream.
Step 3: Whisk the Egg Yolks
In a mixing bowl, whisk together the egg yolks, granulated sugar, and a pinch of salt until well combined and slightly thickened. This step is crucial for incorporating air into your mixture, ensuring a silky custard.
Step 4: Combine the Cream and Egg Mixture
Now comes the exciting part! Slowly pour the warm cream into the egg mixture while whisking continuously. This technique, known as tempering, helps to prevent the egg yolks from scrambling.
Step 5: Strain the Mixture
To create a smooth custard, strain the mixture through a fine sieve into a pitcher or bowl. This will catch any lumps or cooked egg bits.
Step 6: Prepare the Ramekins
Divide your silky mixture into ramekins and place them in a baking dish. Pour hot water into the dish until it reaches halfway up the sides of the ramekins. This water bath will gently cook the custard, preventing it from becoming rubbery.
Step 7: Bake the Custard
Bake for about 40-45 minutes until the custard is set but still slightly jiggly in the center. This gentle cooking method is key to obtaining a creamy texture.
Step 8: Cool and Chill
Once baked, carefully remove the ramekins from the water and let them cool. Transfer them to the refrigerator and chill for at least 2 hours before serving. This waiting period allows the flavors to marry beautifully.
Step 9: Caramelize the Sugar
Just before serving, sprinkle a thin layer of brown sugar on top of each custard. Use a kitchen torch to caramelize the sugar until it’s golden and crispy, creating that iconic crackling top. If you don’t have a torch, you can place them under the broiler for a quick caramelization.
Serving Suggestions & Pairings
Crème brûlée shines on its own, but it can also be complemented with a variety of flavors. Consider serving it with fresh berries to add a hint of tartness, or a dollop of whipped cream topped with mint for an elegant touch. For beverages, pair it with a sweet dessert wine or a cup of rich espresso to elevate the experience.
Storage & Leftovers Guide
If you find yourself with leftover crème brûlée (a rare occurrence!), store them covered in the refrigerator for up to three days. However, avoid caramelizing the sugar until you’re ready to serve, as it’s best enjoyed freshly torched.
Kitchen Wisdom & Success Tips
- Use fresh ingredients: High-quality heavy cream and real vanilla beans will elevate the flavor of your custard dramatically.
- Don’t open the oven: Avoid peeking while they’re baking, as sudden temperature changes can affect the custard’s texture.
- Experiment: Feel free to infuse the cream with different flavors like citrus zest, or herbs for a unique twist.
Flavor Variations & Adaptations
Love experimenting? Try adding a splash of liquor like Grand Marnier or a hint of almond extract for a different flavor profile. You can also replace the vanilla with other extract flavors or infuse the cream with coffee, tea, or spices.
Reader Questions & Solutions
-
Q: My crème brûlée turned out too runny. What went wrong?
A: Ensure that you baked it long enough, and check that the center jiggles slightly. If it’s completely liquid, it likely needed more time to set. -
Q: Can I use a different type of sugar for the caramelizing?
A: Yes! You can use regular granulated sugar, but brown sugar will give it a richer flavor. -
Q: Why did the top crack when I bruleed it?
A: This can happen if the sugar layer is too thick. Aim for a thin, even layer for the best results. -
Q: Can I make this ahead of time?
A: Absolutely! The custards can be made a day ahead. Just caramelize the sugar right before serving. -
Q: What should I do if I don’t have ramekins?
A: You can use any oven-safe dish, though cooking times may vary, so keep an eye on them.
Wrapping Up
There you have it—a traditional crème brûlée recipe that captures both the magic and comfort of this beloved dessert. Whether it’s for a special occasion or an ordinary Tuesday, this dish promises to bring joy to your table. So grab your ingredients and let’s create some beautiful memories together. Happy cooking!
PrintClassic Crème Brûlée
An indulgent crème brûlée with a perfect caramelized sugar top and creamy custard beneath.
- Prep Time: 25 minutes
- Cook Time: 45 minutes
- Total Time: 135 minutes
- Yield: 4 servings 1x
- Category: Dessert
- Method: Baking
- Cuisine: French
- Diet: Vegetarian
Ingredients
- 2 cups heavy cream
- 1 vanilla bean (or 1 teaspoon vanilla extract)
- 5 large egg yolks
- 1/2 cup granulated sugar
- 1/4 cup brown sugar (for caramelizing)
- Pinch of salt
Instructions
- Preheat the oven to 325°F (160°C).
- Simmer the heavy cream with the split and scraped vanilla bean until it begins to simmer; remove from heat and steep for 15 minutes.
- Whisk the egg yolks, granulated sugar, and a pinch of salt together until combined.
- Combine the warm cream into the egg mixture while whisking continuously to prevent the yolks from scrambling.
- Strain the mixture through a fine sieve into a pitcher or bowl.
- Prepare ramekins by dividing the mixture and placing them in a baking dish. Pour hot water into the dish, halfway up the sides of the ramekins.
- Bake for 40-45 minutes until set but still slightly jiggly in the center.
- Cool the ramekins and chill in the refrigerator for at least 2 hours.
- Caramelize a thin layer of brown sugar on top of each custard using a kitchen torch or under the broiler before serving.
Notes
Store leftovers covered in the refrigerator for up to three days; avoid caramelizing sugar until ready to serve.
Nutrition
- Serving Size: 1 serving
- Calories: 400
- Sugar: 25g
- Sodium: 85mg
- Fat: 31g
- Saturated Fat: 17g
- Unsaturated Fat: 10g
- Trans Fat: 0g
- Carbohydrates: 28g
- Fiber: 0g
- Protein: 7g
- Cholesterol: 180mg