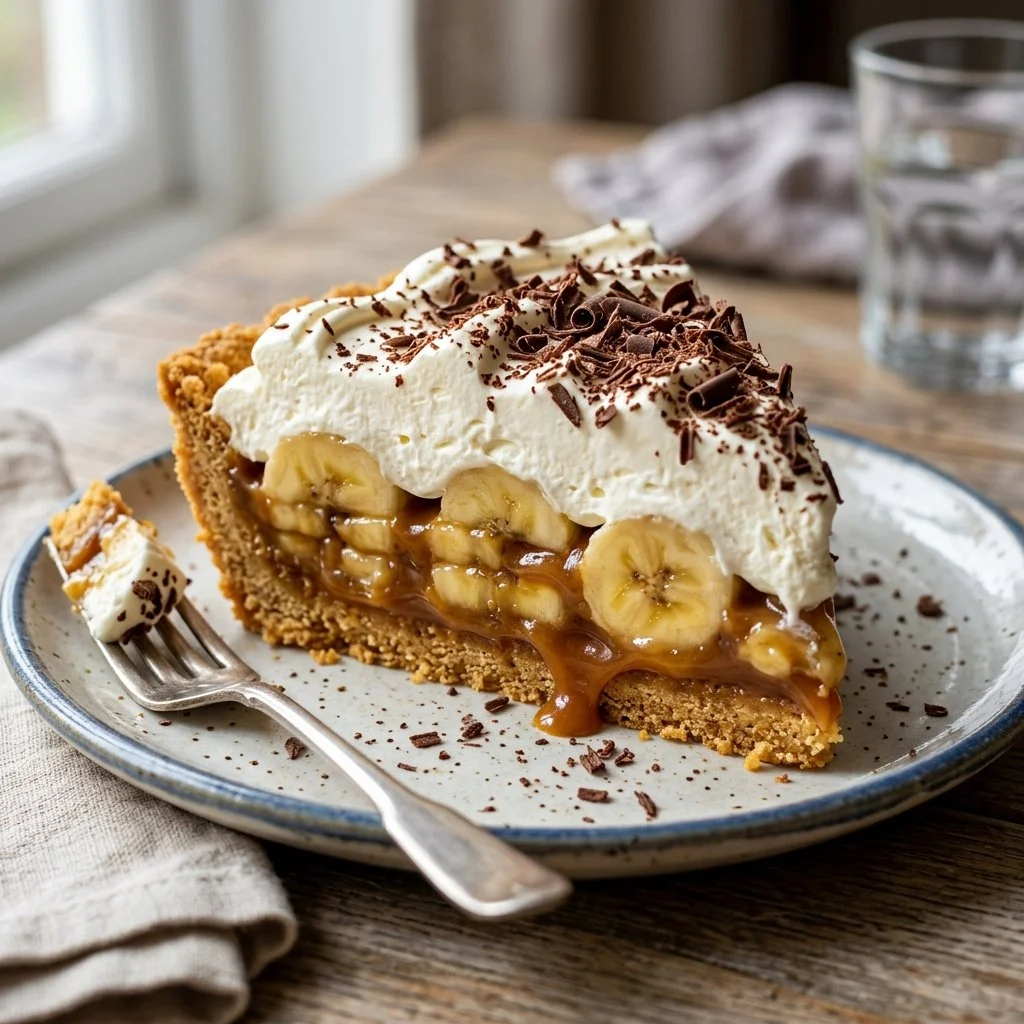
There’s something undeniably magical about the union of bananas, cream, and caramel wrapped in a delightful crust. For me, Banoffee Pie isn’t just a dessert; it’s a warm hug on a chilly day. I remember the first time I encountered this luscious treat; it was in a cozy little café tucked away in a charming English town. The moment I took my first bite, the smooth caramel danced with the sweetness of ripe bananas and the light fluffiness of whipped cream—it was pure bliss. Ever since then, Banoffee Pie has secured a special place in my heart and my recipe collection.
Recipe Timing
- Prep Duration: 15 minutes
- Active Cooking: 2 hours (for caramel)
- Total Duration: 2 hours 15 minutes
- Portion Size: Serves 8
- Complexity: Simple
Nutritional Recipe
- Calories per portion: Approximately 350
- Protein: 4 grams
- Carbs: 50 grams
- Fats: 18 grams
- Fiber: 2 grams
- Sugars: 27 grams
- Sodium: 120 mg
Why You’ll Love This Banoffee Pie
What’s not to adore about a dessert that tastes like it took hours of labor but is surprisingly straightforward to whip up? The first spoonful reveals layers of rich caramel that meld wonderfully with the soft, tender bananas, each bite finished with a light touch of fluffy cream. Plus, it’s a showstopper! Here’s the best part: It doesn’t require baking (unless you choose to make your own crust), making it a fantastic choice for both novice cooks and seasoned bakers alike. This is not just a dessert; it’s a conversation starter and a memory maker.
The Complete Cooking Journey
Let’s dive into the steps to craft your own Banoffee Pie, a classic dessert that’s sure to impress at any gathering or family dinner.
Ingredients:
- 1 pie crust (graham cracker or digestive biscuits)
- 4 ripe bananas
- 1 cup heavy cream
- 1 can (14 oz) sweetened condensed milk
- 2 tablespoons unsweetened cocoa powder or grated chocolate for garnish
- 1 tablespoon vanilla extract
Method:
Step 1: Prepare the Pie Crust
Follow the package instructions for your pie crust or craft your own with crushed graham crackers mixed with melted butter. Press the mixture into a pie dish and set aside while you focus on the caramel.
Step 2: Create the Caramel
In a saucepan, carefully boil the can of sweetened condensed milk submerged in water for about 2 hours. This will transform your ordinary condensed milk into a luscious caramel. Tip: make sure the can is always covered with water to prevent it from bursting! Once time is up, let it cool completely.
Step 3: Assemble the Caramel Layer
Once the caramel can has cooled and safely opened, pour the sweet, thick caramel sauce into your prepared pie crust, spreading it out evenly.
Step 4: Layer the Bananas
Slice the ripe bananas into rounds and layer them generously over the caramel. The sweetness of the bananas offers a delightful contrast to the rich caramel.
Step 5: Whip the Cream
In a mixing bowl, whip the heavy cream along with vanilla extract until soft peaks form. Gently spread this creamy cloud over the bananas, creating a luscious topping that adds a lightness to the pie.
Step 6: Garnish
Sprinkle unsweetened cocoa powder or grated chocolate on top of the whipped cream. It’s not just for looks; it introduces an extra layer of flavor that elevates the pie.
Step 7: Chill and Serve
Place the Banoffee Pie in the refrigerator to chill for at least one hour. This enables the flavors to meld beautifully and allows your dessert to set up just right.
Serving Suggestions & Pairings
Banoffee Pie shines on its own, but you can elevate your presentation with a sprinkle of nuts, a drizzle of chocolate sauce, or even a scoop of vanilla ice cream on the side. This delicious pie pairs wonderfully with a cup of freshly brewed coffee or a light herbal tea, providing a perfect balance to the sweetness.
Storage & Leftovers Guide
If you have leftovers (which I can’t guarantee!), cover the pie tightly with plastic wrap or aluminum foil and store it in the fridge. It’s best enjoyed within 2-3 days, but trust me, it might not last that long!
Kitchen Wisdom & Success Tips
- Ensure your bananas are perfectly ripe, with a few spots, for the best flavor.
- Want to quicken the caramel process? Try using dulce de leche instead, which is available in many stores.
- If you’re preparing ahead of time, consider assembling everything except the whipped cream, which can be added right before serving for maximum freshness.
Flavor Variations & Adaptations
For a spiced twist, sprinkle a touch of cinnamon into your whipped cream. You can also swap the graham cracker crust for a chocolate cookie crust for an extra chocolatey treat. Enjoy experimenting with flavors; the possibilities are as endless as your imagination!
Reader Questions & Solutions
-
How do I know if my caramel is cooked properly?
- The caramel should be a deep golden brown and thick. If it’s still runny after cooking, continue to simmer for another 10-15 minutes.
-
Can I use fresh whipped cream from a can?
- Absolutely! While homemade whipped cream offers the best flavor and texture, canned whipped cream can be a convenient alternative.
-
What if my bananas brown too quickly?
- To slow the browning, you can toss banana slices in a tiny bit of lemon juice, which also adds a light tanginess to the dish.
-
Can I freeze Banoffee Pie?
- It’s not advisable to freeze Banoffee Pie since the whipped cream may separate upon thawing. Stick to chilling it in the fridge instead.
-
I don’t have heavy cream. Can I use something else?
- Yes! You can substitute with mascarpone cheese mixed with a bit of milk or use a non-dairy whipped topping for a dairy-free version.
Wrapping Up
Creating a Banoffee Pie is like crafting a piece of edible art, filled with flavors that harmonize beautifully. This recipe is not only simple, but it’s also a way to indulge in something delicious and homemade. I hope you feel inspired to give it a try and invite friends and family to join you in this delightful experience. Happy baking!
PrintBanoffee Pie
A delightful dessert combining bananas, cream, and caramel in a simple, no-bake pie.
- Prep Time: 15 minutes
- Cook Time: 120 minutes
- Total Time: 135 minutes
- Yield: 8 servings 1x
- Category: Dessert
- Method: No-Bake
- Cuisine: British
- Diet: Vegetarian
Ingredients
- 1 pie crust (graham cracker or digestive biscuits)
- 4 ripe bananas
- 1 cup heavy cream
- 1 can (14 oz) sweetened condensed milk
- 2 tablespoons unsweetened cocoa powder or grated chocolate for garnish
- 1 tablespoon vanilla extract
Instructions
- Prepare the Pie Crust: Follow the package instructions for your pie crust or craft your own with crushed graham crackers mixed with melted butter. Press the mixture into a pie dish and set aside.
- Create the Caramel: In a saucepan, carefully boil the can of sweetened condensed milk submerged in water for about 120 minutes, ensuring the can always remains covered with water. Once time is up, let it cool completely.
- Assemble the Caramel Layer: Pour the caramel sauce into your prepared pie crust, spreading it evenly.
- Layer the Bananas: Slice the bananas into rounds and layer them generously over the caramel.
- Whip the Cream: In a mixing bowl, whip the heavy cream with vanilla extract until soft peaks form. Gently spread this over the bananas.
- Garnish: Sprinkle cocoa powder or grated chocolate on top for flavor.
- Chill and Serve: Place the pie in the fridge to chill for at least 60 minutes before serving.
Notes
For best flavor, ensure bananas are ripe with spots. You can use dulce de leche to quicken the caramel process.
Nutrition
- Serving Size: 1 serving
- Calories: 350
- Sugar: 27g
- Sodium: 120mg
- Fat: 18g
- Saturated Fat: 11g
- Unsaturated Fat: 7g
- Trans Fat: 0g
- Carbohydrates: 50g
- Fiber: 2g
- Protein: 4g
- Cholesterol: 30mg